This post is mostly about the problems I've been having with running photo retouching actions on my dark eyed but fair skinned daughter. My favorite Photoshop Elements action is 2 Minute Miracle from The CoffeShop Blog, but while it is ideal for my blued eyed boys, it does seem to have issues with my brown eyed girls (and one brown eyed boy).
Here, see what I mean. This is a photo of my baby (who is almost 5, ACK).
This isn't the best of photos, as silly mama didn't think she would want pictures of another child's birthday party. I didn't have my camera with me, so I took this with my iPod. Anyway, the only work done on this photo was cropping and I used the clone stamp tool to clean up some pizza sauce off her check (clone stamp tool on the laptop is almost better than wipies in the purse).
This is the same photo with the 2 Minute Miracle action applied to following the tutorial for the Eye Bright portion of it. I left the opacity of "Bright Eyes" layer at 100%, and as you can see it didn't result in space alien eyes at all. Actually, they look great. Except... it turned her brown eyes blue. A pretty blue, to be sure, but blue nonetheless. I've ran into this problem with other photos as well, although depending on the lighting sometimes it turns her eyes green.
Here's the same photo again, with the same 2 Minute Miracle action, but this time I set the "Bright Eyes" layer to 0%. She looks more like herself, but here her eyes seem a little dull and not quite right to me. Part of the joy that is the 2 Minute Miracle is the way it makes eyes POP, and these just don't.
Same photo, same action, now with the "Bright Eyes" layer set at 30%. It's better than 0%, but there is still a blue-ish cast. When I go lower to 20-15%, you can hardly tell a difference from the 0%. I can live with this, and it has been what I've been using for her photos, but I'm not completely happy.
This time after running the 2 Minute Miracle action I hid the "Bright Eyes" layer and then ran the PowderRoom After Dark action. This action was made for retouching dark complexions, so I hid all of the layers of it except the "Eye Pop" layer and left it at 100% (the skin smoothing and defining layers are just way too much contrast for fair skin). I can't discern much if any difference between this and the photo above, so it's not the solution I'm looking for.
Showing posts with label Photoshop Elements. Show all posts
Showing posts with label Photoshop Elements. Show all posts
Thursday, January 12, 2012
Thursday, May 19, 2011
PSE Drop Shadows
This is a tutorial for adding shadows to items in Photoshop Elements; I'll be using digital papers but the steps will be the same regardless of what you want to add a shadow to. The screen shots are from PSE version 8, but the concepts apply to all versions. As always, click on any screen shot to see it full sized.
First we just set up what we want a shadow on. I am using a couple digital papers from Daisy Country Value Collection created by Teresa Loman of Digital Scrapbook Place. I resized and rotated the yellow paper using the Free Transform tool.
Make sure the layer you want to apply a shadow on is selected (darkened) in the Layers bin on the right.
Now open the Effects bin on the right by double clicking on the word "Effects". Then select "Layer Styles" option; the icon is within the smaller red circle. Once that is selected, go to the drop down menu and select "Drop Shadows".
The "Low" option is most similar to what we want our shadow to look like, so we will select it. Double click on it, or select it and hit the "Apply" button.
After double clicking the "Low" icon, or selecting it and hitting "Apply", the fx icon will appear on the right of the layer that the shadow was applied to. See it within the smaller red circle.
Now we will be working with that fx icon to adjust the drop shadow. Double click on it.
Once you double click on the fx icon, this pop up menu will appear.
From here you can adjust not only the shadow, but other things as well such as bevels, glow, and stroke. Bevels are like the edges of a finished piece of wood when a router has been used on it. Think of a picture frame. Glow puts highlights and lowlights on an item, and is often used to make it look like metal or plastic. Stroke outlines an item, such as a photo, in solid color. All of these are accessed from the Layer Styles drop down menu in the Effects bin, although Stroke can also be accessed under the top menu option "Edit".
Here I have changed the settings for the Drop Shadow. The setting of 8, 8, 55 is a good place to start and is adequate for most digital scrapping needs. After inputting the numbers I clicked "OK" and the changes to the shadow were applied. Feel free to adjust the numbers up or down from my recommendations as you desire to get the look you want.
We're done with putting a shadow on this paper.
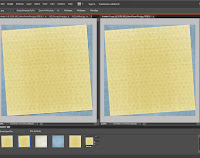 Here you can see the same digital papers side by side, one with a drop shadow applied and the other without it. The first helps creates the illusion of realism, giving depth to the image. That is the point of working with shadows in our digital scrapbooking.
Lastly here are just a couple extra tips, shortcuts really, one to make adding shadows a bit quicker and the other will help you personalize PSE's interface to your own preferences. These may not be applicable to earlier versions of PSE. I know they weren't possible with PSE 5, and while I am not sure I don't think they were options with PSE 6 or 7 (if you know otherwise, please let me know).
Once you have your drop shadow set just how you want it on one item, you can easily apply the same shadow with the same settings to another by this method. Right click on the layer in the Layers bin that has the shadow on it. A menu will appear (for some reason my computer didn't want to take screen shots of that menu). On that menu select "Copy Layer Style". Then, once you have your next paper or item in your layout, you can then right click on it in the Layers bin and select "Paste Layer Style". The shadow will then be on that layer with the exact same settings as the other layer.
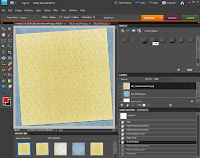
To personalize PSE, right click on the "Low" icon in the Drop Shadow menu and choose the "Add to Favorites" option.
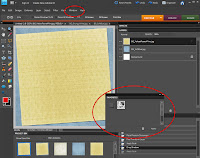
Now go above the work space to the top menu and click on "Windows" (within the smaller red circle). From that drop menu choose "Favorites" and the Favorites bin will appear floating (within the larger red circle).
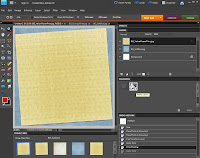 Now drag this floating Favorites bin into the docked bins on the right, by clicking and dragging the tab with the word "Favorites" on it and putting it below the Layers bin. A glowing blue line will appear to show you where the bin will be when you let go of the mouse and "drop" it.
You can leave the bin there, or move it up or down by clicking and dragging it to where you want it to be. I like to organize my bins by having Undo History and Favorites in the same location, and I can access one or the other of them by clicking on the tabs. I added the Undo History bin from the "Windows" menu the same way that I added the Favorites bin. There are a lot of bin options in the "Windows" menu. Feel free to play with them to find what set up works best for you.
In my Favorites bin you can also see the icon for "Masks Layers". It is for using layer masks in PSE, and I did a tutorial about layer masks previously that you may be interested in. It is more technical than this one, but I have been told that it is understandable even to a PSE newbie.
First we just set up what we want a shadow on. I am using a couple digital papers from Daisy Country Value Collection created by Teresa Loman of Digital Scrapbook Place. I resized and rotated the yellow paper using the Free Transform tool.
Make sure the layer you want to apply a shadow on is selected (darkened) in the Layers bin on the right.
Now open the Effects bin on the right by double clicking on the word "Effects". Then select "Layer Styles" option; the icon is within the smaller red circle. Once that is selected, go to the drop down menu and select "Drop Shadows".
The "Low" option is most similar to what we want our shadow to look like, so we will select it. Double click on it, or select it and hit the "Apply" button.
After double clicking the "Low" icon, or selecting it and hitting "Apply", the fx icon will appear on the right of the layer that the shadow was applied to. See it within the smaller red circle.
Now we will be working with that fx icon to adjust the drop shadow. Double click on it.
Once you double click on the fx icon, this pop up menu will appear.
From here you can adjust not only the shadow, but other things as well such as bevels, glow, and stroke. Bevels are like the edges of a finished piece of wood when a router has been used on it. Think of a picture frame. Glow puts highlights and lowlights on an item, and is often used to make it look like metal or plastic. Stroke outlines an item, such as a photo, in solid color. All of these are accessed from the Layer Styles drop down menu in the Effects bin, although Stroke can also be accessed under the top menu option "Edit".
Here I have changed the settings for the Drop Shadow. The setting of 8, 8, 55 is a good place to start and is adequate for most digital scrapping needs. After inputting the numbers I clicked "OK" and the changes to the shadow were applied. Feel free to adjust the numbers up or down from my recommendations as you desire to get the look you want.
We're done with putting a shadow on this paper.
 Here you can see the same digital papers side by side, one with a drop shadow applied and the other without it. The first helps creates the illusion of realism, giving depth to the image. That is the point of working with shadows in our digital scrapbooking.
 Lastly here are just a couple extra tips, shortcuts really, one to make adding shadows a bit quicker and the other will help you personalize PSE's interface to your own preferences. These may not be applicable to earlier versions of PSE. I know they weren't possible with PSE 5, and while I am not sure I don't think they were options with PSE 6 or 7 (if you know otherwise, please let me know).
Once you have your drop shadow set just how you want it on one item, you can easily apply the same shadow with the same settings to another by this method. Right click on the layer in the Layers bin that has the shadow on it. A menu will appear (for some reason my computer didn't want to take screen shots of that menu). On that menu select "Copy Layer Style". Then, once you have your next paper or item in your layout, you can then right click on it in the Layers bin and select "Paste Layer Style". The shadow will then be on that layer with the exact same settings as the other layer.


To personalize PSE, right click on the "Low" icon in the Drop Shadow menu and choose the "Add to Favorites" option.
Now go above the work space to the top menu and click on "Windows" (within the smaller red circle). From that drop menu choose "Favorites" and the Favorites bin will appear floating (within the larger red circle).
 Now drag this floating Favorites bin into the docked bins on the right, by clicking and dragging the tab with the word "Favorites" on it and putting it below the Layers bin. A glowing blue line will appear to show you where the bin will be when you let go of the mouse and "drop" it.
You can leave the bin there, or move it up or down by clicking and dragging it to where you want it to be. I like to organize my bins by having Undo History and Favorites in the same location, and I can access one or the other of them by clicking on the tabs. I added the Undo History bin from the "Windows" menu the same way that I added the Favorites bin. There are a lot of bin options in the "Windows" menu. Feel free to play with them to find what set up works best for you.
In my Favorites bin you can also see the icon for "Masks Layers". It is for using layer masks in PSE, and I did a tutorial about layer masks previously that you may be interested in. It is more technical than this one, but I have been told that it is understandable even to a PSE newbie.
Wednesday, May 18, 2011
PSE Free Transform
This is a tutorial for Photoshop Elements' free transform tool, with a focus on resizing and rotating items without skewing or distorting the item. The screen shots are from PSE version 8, but the concepts apply to all versions. As always, click on any screen shot to see it full sized.
Start by putting your photo (or other item you wish to resize) in your working area and selecting the Move tool. It is the little crosshairs and cursor icon first in the Tools bin on the left (within the red circle). However, you can also select the Move tool with the keyboard shortcut V (just hit the letter V). Make sure the "Show Bounding Box" option is check above (where the red checkmark is) and that the photo is bounded by those little squares on the corners and half way along each side (also shown within the red circle).
Now get the Free Transform tool going. Free Transform is a function of the Move tool, so that is why I had us start with it. With the Move tool selected, put your cursor on one of the bounding box squares and click. This automatically gets the Free Transform tool open. In addition, you can use the keyboard shortcut of holding the control key and hitting the letter T (ctrl+T) to select the Free Transform tool at any time, whether the Move tool is selected or not.
Notice that the bounding box on the photo changed slightly, now that the Free Transform tool is in action. It went from dotted lines between the squares to solid lines between. Also notice that the menu above the working space has also changed.
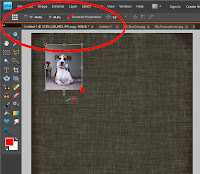 When you begin to resize your photo, you need to verify that the "Constrain Proportions" box is checked (notice red checkmark). Now click and drag one of the corners of the photo to make it bigger or smaller (note, in the program the cursor will change to look like a small double headed black arrow when you are on the corner). Notice that the percent resized is equal for both width and height, designated W: and H: within the red circle (both are 44.4% here).
This screen shot shows what happens when you try to click and drag a corner of the photo when "Constrain Proportions" is not checked. The result is what is called a skewed or distorted photo, with the percent changed being unequal for the width and height (74.7% and 56.2% respectively).
This last screen shot simply shows rotating or tilting a photo using the Free Transform tool. Put the cursor over the little circle that appears below the bottom center of the bounding box. The cursor will change into a little circle made up of little black arrows when there. Then click and drag right or left to rotate or tilt the photo.
The tool item that is underlined in red here shows the degree of rotation. It's nice sometimes to know the exact degree of rotation so that you can match up exact angles on other items, if you need to do so.
When you finish resizing and rotating your photo, simply click on the green checkmark that appears below it whenever the Free Transform tool is selected. Doing this makes your changes. Clicking on the red circle with a line through it undoes your changes.
Start by putting your photo (or other item you wish to resize) in your working area and selecting the Move tool. It is the little crosshairs and cursor icon first in the Tools bin on the left (within the red circle). However, you can also select the Move tool with the keyboard shortcut V (just hit the letter V). Make sure the "Show Bounding Box" option is check above (where the red checkmark is) and that the photo is bounded by those little squares on the corners and half way along each side (also shown within the red circle).
Now get the Free Transform tool going. Free Transform is a function of the Move tool, so that is why I had us start with it. With the Move tool selected, put your cursor on one of the bounding box squares and click. This automatically gets the Free Transform tool open. In addition, you can use the keyboard shortcut of holding the control key and hitting the letter T (ctrl+T) to select the Free Transform tool at any time, whether the Move tool is selected or not.
Notice that the bounding box on the photo changed slightly, now that the Free Transform tool is in action. It went from dotted lines between the squares to solid lines between. Also notice that the menu above the working space has also changed.
 When you begin to resize your photo, you need to verify that the "Constrain Proportions" box is checked (notice red checkmark). Now click and drag one of the corners of the photo to make it bigger or smaller (note, in the program the cursor will change to look like a small double headed black arrow when you are on the corner). Notice that the percent resized is equal for both width and height, designated W: and H: within the red circle (both are 44.4% here).
 This screen shot shows what happens when you try to click and drag a corner of the photo when "Constrain Proportions" is not checked. The result is what is called a skewed or distorted photo, with the percent changed being unequal for the width and height (74.7% and 56.2% respectively).
This last screen shot simply shows rotating or tilting a photo using the Free Transform tool. Put the cursor over the little circle that appears below the bottom center of the bounding box. The cursor will change into a little circle made up of little black arrows when there. Then click and drag right or left to rotate or tilt the photo.
The tool item that is underlined in red here shows the degree of rotation. It's nice sometimes to know the exact degree of rotation so that you can match up exact angles on other items, if you need to do so.
When you finish resizing and rotating your photo, simply click on the green checkmark that appears below it whenever the Free Transform tool is selected. Doing this makes your changes. Clicking on the red circle with a line through it undoes your changes.
Thursday, May 6, 2010
Using the Gradient Tool with Layer Masks in PSE
Now that you know how to use layer masks, you are ready to use the gradient tool. Set up PSE to have a photo layered over a paper like this. (Papers are from Fantasia's Charm Backpack created by Nicole Young, a blog freebie that will soon be available in the DSP store.) (Click on any of the photos to see them larger.)
Apply a layer mask to the photo layer (see this tutorial for how). Also, make sure the mask is selected, indicated by the double frame around it.
Now select the gradient tool on the left Tool Bin (arrow 1). Once that is selected, go up to the tool menu and select “linear gradient” (arrow 2). Finally, make sure black is set as the foreground color (arrow 3).(Oooop, I have white as my foreground color and I had to change it before proceeding. The keyboard shortcut X easily switches the foreground and background colors.)
On your layout, click where you want the fading to start and drag to where you want it to end. The shorter the distance you drag the more abrupt the fading, and the longer distance you drag the more gradual the fading. Try it again and again dragging in different directions, even at angles, until you achieve the look you want. Here are a couple different results.
Layer Masks in Photoshop Elements
Someone over at DSP was asking me about how to use the gradient tool to easily and quickly fade a photo into a background. Simple right? Except she is a newbie, and even if she knows about layer masks other newbies won’t. Sadly, I can’t find a decent and not confusing tutorial about layer masks in Photoshop Elements (PSE), so I have decided to make one myself. I hope I have made this not confusing, but if it is less than clear please let me know and I will rework it. All screen shots are from PSE 8.
What are layer masks?
Imagine that you lay a piece of paper on top of a photo so that you can’t see the photo. Now imagine you cut a hole in the paper, so that now you can see a portion of the photo. That is a simplification of what a layer mask does. When you apply a layer mask to a layer in PSE, it becomes like that piece of paper. It blocks you from seeing whatever is below it, but when you cut a hole in the layer mask, by using the brush tool to paint black on it, you see portions of what is below the mask.
This is a screen shot of paper with a layer mask applied and you can see where I painted black on the layer mask a hole in the top paper has been made showing the green paper below it. (Papers are from Fantasia's Charm Backpack created by Nicole Young, a blog freebie that will soon be available in the DSP store.) Notice how the black painting on the layer mask on the right corresponds to the hole in the paper. (Click on the images to see them nice and big.)
How do you apply a layer mask?
In full-blown Photoshop (and the newest version, Creative Suite 5 has been announced), all you have to do to apply a layer mask is click a little icon. Sadly, however, PSE doesn't come with layer masks and you must use one of two work-arounds to achieve the same effect. The first, using Adjustment Layers, requires no set up before beginning, but does require more steps and more layers in your layout, not to mention that for some reason every time you click on your layout with the move tool in PSE 8 the Adjustment Layer is always selected. I find that so annoying that I personally opt to not use Adjustment Layers, but rather use Grant’s Tools. Grant’s Tools require time and effort to set up, but set up is a one-time thing and thereafter applying a layer mask is as easy as it is in Photoshop. First, I will describe how to use Adjustment Layers as layer masks, and then I will tell you how to install and use Grant’s Tools.
Adjustment Layers
Let’s practice using two papers of different colors, as I have done in my samples.
Now, at the bottom of the layers bin on the right you will notice a little icon that is half-black and half-white. That is the Adjustment Layers icon. Click and choose the top option, “solid color”. It doesn’t matter at all what color you choose.
Make sure the Adjustment Layer is directly underneath the layer you wish to be masked. You may have to move it to get it there. Then select the layer you wish to be masked, the top paper in our example, and group it with the layer mask by holding the Control key and hitting the letter G (ctrl+G). The masked layer will now be inset a bit and have an arrow pointing down to the Adjustment Layer.
Now we are ready to start painting on the layer mask. Make sure the mask is selected in the layer bin at the right. Notice how that layer is darker, and how the mask (the white box) has a double frame around it. That is how you know it is selected.
Now use the brush tool (the paintbrush icon on the tool bin to the right, or keyboard shortcut B) and paint black on the paper in the working space (not in the layer bin). Painting black will have the same effect as if you were using the eraser tool, but by using a layer mask you can go back and paint it white again to put back what you “erased” away.
Grant’s Tools
Grant’s Tools are effects you can download and install into PSE to give it some options that are similar to Photoshop. Each version of PSE has its own Grant’s Tools download, so be sure you get the right one. You can find the Grant’s Tools downloads here. After downloading the tools, unzip them. The trickiest part is installing them, but I feel they are very much worth it. I use the masks layer tool in almost every layout I do. I am sorry I am Mac ignorant and cannot even begin to address how Grant’s Tools can be installed on a Mac computer, although I have read it can be done.
Prepare to install Grant’s Tools. You must make sure PSE is not open, and you must make sure that you have Window’s set to show hidden files. This page shows you how to do it in Vista, and it is the same in XP and 7.
Install Grant's Tools
1. In the Grant’s Tools folder that you downloaded and unzipped, open the folder called “actions pngs and xml files” and copy all of the files.
2. Now you need to paste these files into the PSE Photo Effects folder.
1. In the Grant’s Tools folder that you downloaded and unzipped, open the folder called “actions pngs and xml files” and copy all of the files.
2. Now you need to paste these files into the PSE Photo Effects folder.
For Windows Vista and 7 the path is C:\ProgramData\Adobe\Photoshop Elements\8.0\Photo Creations\Photo Effects
For Windows XP the path is C:\Documents and Settings\All Users\Application Data\Adobe\Photoshop Elements\8.0\Photo Creations\Photo Effects
3. Next, you must rename an existing file, to point PSE in the right direction for Grant’s Tools. You must rename the file Mediadatabase.db3 to be MediadatabaseOLD.db3 (the same name with the word “OLD” added to the end in caps).
3. Next, you must rename an existing file, to point PSE in the right direction for Grant’s Tools. You must rename the file Mediadatabase.db3 to be MediadatabaseOLD.db3 (the same name with the word “OLD” added to the end in caps).
For Windows Vista and 7 the path to locate this file is C:\Program Data\Adobe\ Photoshop Elements\8.0\Locale\en-US
For Windows XP the path to locate this file is C:\Documents and Settings\All Users\Application Data\Adobe\Photoshop Elements\8.0\Locale\en-US
4. Now start PSE editor. It will take a long time for PSE to start up this first time after installing Grant’s Tools, but don’t be concerned. The software is “rebuilding” its database. It will start as normally after that initial time.
Using Grant’s Tools
You will find Grant's Tools in PSE under Effects>Photo Effects. If you are anything like me, you will be using the masks layers tool all of the time, so I suggest you add it to your Favorites. You can easily do this by right clicking on the masks layer icon and choosing “Add to Favorites” from the pop- up menu. You can add a favorites bin to the right by choosing it from the Window menu at the top of PSE. I also added low drop shadow to my favorites bin, so that both are easily accessible, since I use them so often.
Set up two contrasting pieces of paper as you did for Adjustment Layers.
With the layer you want masked selected, double click on the Grant’s Tools masks layers icon.
Make sure the mask is selected in the layer bin at the right. Notice how that layer is darker, and how the mask (the white box) has a double frame around it. That is how you know it is selected.
Now use the brush tool (the paintbrush icon on the tool bin to the right, or keyboard shortcut B) and paint black on the paper in the working space (not in the layer bin). Painting black will have the same effect as if you were using the eraser tool, but by using a layer mask you can go back and paint it white again to put back what you “erased” away.
Sunday, March 28, 2010
Make-It Monday - Digital Scrapbooking
Scrapbooking is a hobby that has been all the rage for years now, but digital scrapbooking is a form of it that is just beginning to come into its own. As the name implies, digital scrapbooking is scrapbooking done digitally, on the computer. With a computer, some software, a digital "page kit", and a little playing you can achieve a page that ends up looking just like a photograph of a paper scrapped page. Take this one at the right (click on it, or any of the others here, to go to the full sized page). Pages with similar looks can be found in scrapbooking magazines, samples at scrapbooking stores, and in albums in homes across the world. The difference with my page, however, is that no glue, scissors, pieces of paper, ribbons, and all that other stuff was needed, and I didn't have to figure out how to store and organize that stuff either. I love that I can get that great look, without all the mess and hassle. Besides, digital page kits are much more economical. With traditional scrapbooking you use a paper once, and if you want to use it again you have to buy it again. With digital scrapbooking I can use the same "paper" a hundred times over, if I so desire, and it's never used up.
 But the benefits of digital scrapbooking over traditional scrapbooking don't stop with less mess and less cost. With digital scrapbooking you can create looks that paper scrappers can't even imagine. This is where it shines, in my opinion. Trimming close to a person or subject in a photo is commonly done even in paper scrapping, but in digital you can take it to an entire new level. See this page to the left. I was able to extract the baby from the photo (the original shot is of him laying on a quilt) and "put" him in those clouds and it really looks like he is sleeping there. Then there is the "graphic" style of digital scrapbook page that doesn't even have a tradition equivalent, such as the page to the right. The blending of the photo, "paper", and word art done here is unique to digital scrapbooking.
Anyway, I have been doing digital scrapbooking for over four years now, and I find myself getting more into this hobby as time has gone on instead of less. However, it does have a learning curve, as there usually is with any hobby. The specific details such as software choice, technical how-to, where and how to print pages, and much more are too broad to go into here in this introduction to digital scrapbooking blog post. My digi scrapping home online is Digital Scrapbook Place, and if you want to find out more I suggest you start there. Look me up if you decide to check it out. My user name there is "Robin E." Feel free to ask me questions here too, if you are interested. I am happy to go on and on about this subject and have helped more than one person get started in it.
 of a paper scrapped page. Take this one at the right (click on it, or any of the others here, to go to the full sized page). Pages with similar looks can be found in scrapbooking magazines, samples at scrapbooking stores, and in albums in homes across the world. The difference with my page, however, is that no glue, scissors, pieces of paper, ribbons, and all that other stuff was needed, and I didn't have to figure out how to store and organize that stuff either. I love that I can get that great look, without all the mess and hassle. Besides, digital page kits are much more economical. With traditional scrapbooking you use a paper once, and if you want to use it again you have to buy it again. With digital scrapbooking I can use the same "paper" a hundred times over, if I so desire, and it's never used up.
 But the benefits of digital scrapbooking over traditional scrapbooking don't stop with less mess and less cost. With digital scrapbooking you can create looks that paper scrappers can't even imagine. This is where it shines, in my opinion. Trimming close to a person or subject in a photo is commonly done even in paper scrapping, but in digital you can take it to an entire new level. See this page to the left. I was able to extract the baby from the photo (the original shot is of him laying on a quilt) and "put" him in those clouds and it really looks like he is sleeping there. Then there is the "graphic" style of digital scrapbook page that doesn't even have a tradition equivalent, such as the page to the right. The blending of the photo, "paper", and word art done here is unique to digital scrapbooking.
 Anyway, I have been doing digital scrapbooking for over four years now, and I find myself getting more into this hobby as time has gone on instead of less. However, it does have a learning curve, as there usually is with any hobby. The specific details such as software choice, technical how-to, where and how to print pages, and much more are too broad to go into here in this introduction to digital scrapbooking blog post. My digi scrapping home online is Digital Scrapbook Place, and if you want to find out more I suggest you start there. Look me up if you decide to check it out. My user name there is "Robin E." Feel free to ask me questions here too, if you are interested. I am happy to go on and on about this subject and have helped more than one person get started in it.
Subscribe to:
Posts (Atom)


