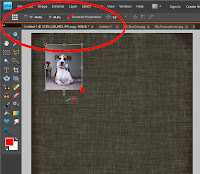
Start by putting your photo (or other item you wish to resize) in your working area and selecting the Move tool. It is the little crosshairs and cursor icon first in the Tools bin on the left (within the red circle). However, you can also select the Move tool with the keyboard shortcut V (just hit the letter V). Make sure the "Show Bounding Box" option is check above (where the red checkmark is) and that the photo is bounded by those little squares on the corners and half way along each side (also shown within the red circle).
Now get the Free Transform tool going. Free Transform is a function of the Move tool, so that is why I had us start with it. With the Move tool selected, put your cursor on one of the bounding box squares and click. This automatically gets the Free Transform tool open. In addition, you can use the keyboard shortcut of holding the control key and hitting the letter T (ctrl+T) to select the Free Transform tool at any time, whether the Move tool is selected or not.
Notice that the bounding box on the photo changed slightly, now that the Free Transform tool is in action. It went from dotted lines between the squares to solid lines between. Also notice that the menu above the working space has also changed.
 When you begin to resize your photo, you need to verify that the "Constrain Proportions" box is checked (notice red checkmark). Now click and drag one of the corners of the photo to make it bigger or smaller (note, in the program the cursor will change to look like a small double headed black arrow when you are on the corner). Notice that the percent resized is equal for both width and height, designated W: and H: within the red circle (both are 44.4% here).
 This screen shot shows what happens when you try to click and drag a corner of the photo when "Constrain Proportions" is not checked. The result is what is called a skewed or distorted photo, with the percent changed being unequal for the width and height (74.7% and 56.2% respectively).
This last screen shot simply shows rotating or tilting a photo using the Free Transform tool. Put the cursor over the little circle that appears below the bottom center of the bounding box. The cursor will change into a little circle made up of little black arrows when there. Then click and drag right or left to rotate or tilt the photo.
The tool item that is underlined in red here shows the degree of rotation. It's nice sometimes to know the exact degree of rotation so that you can match up exact angles on other items, if you need to do so.
When you finish resizing and rotating your photo, simply click on the green checkmark that appears below it whenever the Free Transform tool is selected. Doing this makes your changes. Clicking on the red circle with a line through it undoes your changes.


No comments:
Post a Comment