First we just set up what we want a shadow on. I am using a couple digital papers from Daisy Country Value Collection created by Teresa Loman of Digital Scrapbook Place. I resized and rotated the yellow paper using the Free Transform tool.
Make sure the layer you want to apply a shadow on is selected (darkened) in the Layers bin on the right.
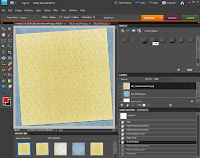
Now open the Effects bin on the right by double clicking on the word "Effects". Then select "Layer Styles" option; the icon is within the smaller red circle. Once that is selected, go to the drop down menu and select "Drop Shadows".
The "Low" option is most similar to what we want our shadow to look like, so we will select it. Double click on it, or select it and hit the "Apply" button.
After double clicking the "Low" icon, or selecting it and hitting "Apply", the fx icon will appear on the right of the layer that the shadow was applied to. See it within the smaller red circle.
Now we will be working with that fx icon to adjust the drop shadow. Double click on it.
Once you double click on the fx icon, this pop up menu will appear.
From here you can adjust not only the shadow, but other things as well such as bevels, glow, and stroke. Bevels are like the edges of a finished piece of wood when a router has been used on it. Think of a picture frame. Glow puts highlights and lowlights on an item, and is often used to make it look like metal or plastic. Stroke outlines an item, such as a photo, in solid color. All of these are accessed from the Layer Styles drop down menu in the Effects bin, although Stroke can also be accessed under the top menu option "Edit".
Here I have changed the settings for the Drop Shadow. The setting of 8, 8, 55 is a good place to start and is adequate for most digital scrapping needs. After inputting the numbers I clicked "OK" and the changes to the shadow were applied. Feel free to adjust the numbers up or down from my recommendations as you desire to get the look you want.
We're done with putting a shadow on this paper.
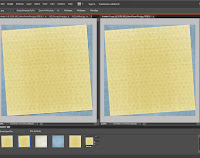
 Here you can see the same digital papers side by side, one with a drop shadow applied and the other without it. The first helps creates the illusion of realism, giving depth to the image. That is the point of working with shadows in our digital scrapbooking.
 Lastly here are just a couple extra tips, shortcuts really, one to make adding shadows a bit quicker and the other will help you personalize PSE's interface to your own preferences. These may not be applicable to earlier versions of PSE. I know they weren't possible with PSE 5, and while I am not sure I don't think they were options with PSE 6 or 7 (if you know otherwise, please let me know).
Once you have your drop shadow set just how you want it on one item, you can easily apply the same shadow with the same settings to another by this method. Right click on the layer in the Layers bin that has the shadow on it. A menu will appear (for some reason my computer didn't want to take screen shots of that menu). On that menu select "Copy Layer Style". Then, once you have your next paper or item in your layout, you can then right click on it in the Layers bin and select "Paste Layer Style". The shadow will then be on that layer with the exact same settings as the other layer.


To personalize PSE, right click on the "Low" icon in the Drop Shadow menu and choose the "Add to Favorites" option.
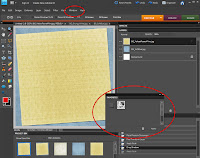
Now go above the work space to the top menu and click on "Windows" (within the smaller red circle). From that drop menu choose "Favorites" and the Favorites bin will appear floating (within the larger red circle).
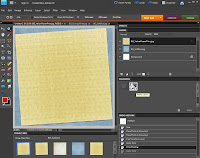
 Now drag this floating Favorites bin into the docked bins on the right, by clicking and dragging the tab with the word "Favorites" on it and putting it below the Layers bin. A glowing blue line will appear to show you where the bin will be when you let go of the mouse and "drop" it.
You can leave the bin there, or move it up or down by clicking and dragging it to where you want it to be. I like to organize my bins by having Undo History and Favorites in the same location, and I can access one or the other of them by clicking on the tabs. I added the Undo History bin from the "Windows" menu the same way that I added the Favorites bin. There are a lot of bin options in the "Windows" menu. Feel free to play with them to find what set up works best for you.
In my Favorites bin you can also see the icon for "Masks Layers". It is for using layer masks in PSE, and I did a tutorial about layer masks previously that you may be interested in. It is more technical than this one, but I have been told that it is understandable even to a PSE newbie.


1 comment:
Great tutorial!!
Post a Comment